Quick Start
Quickstart is intended for users who want to dive in and learn as they go.
Required Programs
#k@ is compatible with both Mac OS X and Linux. Required programs:
- Python 2.7. At present Python 3 & above is not supported.
- CMake
- Gnuplot
- Gephi
- for Mac OS X, an installer such as Homebrew
- recommended: Networkx
#k@ detailed installation instructions.
Build & Configuration Files
#k@ is configured in Python then run in C++. As such, there is a build file:
hashkat/src/config_static.h
The configuration file is called:
hashkat/INFILE.yaml
INFILE.yaml contains many parameters, many of which are never changed. The simplified configuration file is:
hashkat/quickstart_INFILE.yaml
The quickstart file enables users to configure and go. It works with the default build.
- configure quickstart_INFILE.yaml
- save quickstart_INFILE.yaml as INFILE.yaml
- run #k@
Don't worry about losing the original INFILE.yaml as it has the same contents as DEFAULT.yaml.
Note: Do not change DEFAULT.yaml.
What is Hashkat?
#k@ simulates an online social network such as Twitter™. In terms of graph theory agents are 'nodes' and follows 'edges'. Agents are created with certain characteristics and added to the network. Periodically, agents chose to follow other agents. Periodically, agents signal (tweet) or retransmit received signals (retweet). Follow behavior may depend on the content of signals received or characteristics of the tweeting agent.
Create Your Own Simulation
To create your own network, first configure the network for size:
- initial_agent, max_agents, agent add_rate, max_time (simulated time) and max_real_time
- add rate
- the simulation will run until the smaller of max_time (simulated) or max_real_time elapses.
Configure how edges are created and destroyed:
- true/false: follow based on hashtags, follow back, stage1_unfollow (unfollow for relative tweet rate
- rates: unfollow (absolute) tweet rate, hashtag use
- follow_models: random, twitter_suggest (preferential_global), agent, preferential_agent, hashtag, twitter (combination)
Agents and their signals are coded based on:
- Ideology: from 1 to 4
- Agent_types: from 1 to 200
- Preference_Classes (retweet rates by agent_type & tweet_type): from 1 to 2
- Regions: EXACTLY 3
- Languages (hardcoded): English, English+French, French, Spanish
- Tweet_types (hardcoded) : plain, ideological, musical, humorous
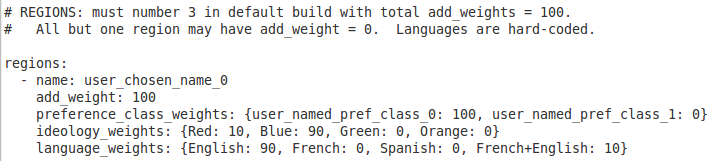
Note: There must be EXACTLY 3 Regions but all but one may have add_weight = 0.
All but one of any of the above may be effectively disabled by setting its add_weight to zero. Put another way, at least one of Ideology, Agent_type, Preference_Class, Language, & Tweet_type must have an add_weight that is not zero. Advanced users may change the maximum numbers permitted in hashkat/src/config_static.h.
To see (briefly) how it comes together, below is an example of a Region configuration in quickstart_INFILE.yaml.
Sample agent_types and preference_classes are shown at bottom of this document. Further information is available in documentation.
Running Hashkat
To run #k@ the first time you must build it by typing in the command:
./build.sh
If you change the defaults in hashkat/src/config_static.h you must re-build #k@ for the changes to take effect.
Once built, you may run #k@ by typing in the command:
./run.sh
or, with a random seed generator:
./run.sh --rand
Each time you run #k@ it writes an output directory, if one already exists it will throw an error.
Therefore after your run you must remove or rename your output directory:
mv output output_my_simulation
Running Hashkat For Second Time
To run #k@ a second time, you need to first remove some files:
- remove: hashkat/network_state.dat
Pro-tip: move network_state.dat into your output file in case you need it in future.
The commands are:
`mv network_state.dat output/network_state.dat`
To change the simulation:
- change what is now INFILE.yaml
- save
- run (with either of the above commands) `
Hashkat Output
The data collected by #k@ during the simulation is sent to files stored in the output directory, created fresh with each run.
Information in #k@ is may be collected by ranks (or bins / buckets) or individually. It may be collected for the whole run or by time period (ie simulated month). Output is usually by array number not name. So languages, for example, will be output as {0,1,2,3} being {English, English+French, French, Spanish}.
Output includes data (.dat) files, which may be viewed raw with any text editor, or may be visualized.
- Agent_Type_info.dat - one for each agent_type
- Categories_Distro.dat
- indegree (follows), outdegree (followed by) and culmulative degree reports for agents (each agent has own ID number)
- degree distribution by follow model
- statistics re follows, followbacks, hashtags, retweets
- most popular tweet content
Files ending .gexf are configured to be visualized with Gephi.
To create a plot of your network, enter Python from the command line by typing in the command:
python
In Python, use Networkx to create a plot of your network:
import matplotlib.pyplot as plt
import networkx as nx
G = nx.read_edgelist('output/network.dat')
pos = nx.spring_layout(G,iterations=75)
nx.draw(G,pos)
plt.show()
You may analyze your network (simulation) with Networkx from Python by running /~hashkat/visualize.py:
../visualize.py
This will produce a plot of your network and save the plot to graph.svg.
See the visualization tutorial for more analysis tools.
Screenshots
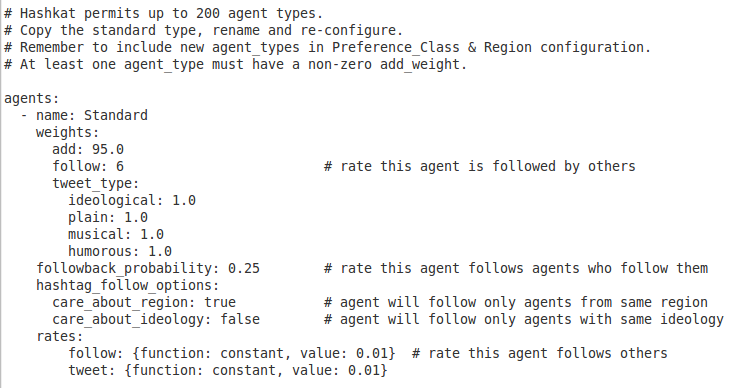
Below is an example of the quickstart_INFILE.yaml agent_type configuration.
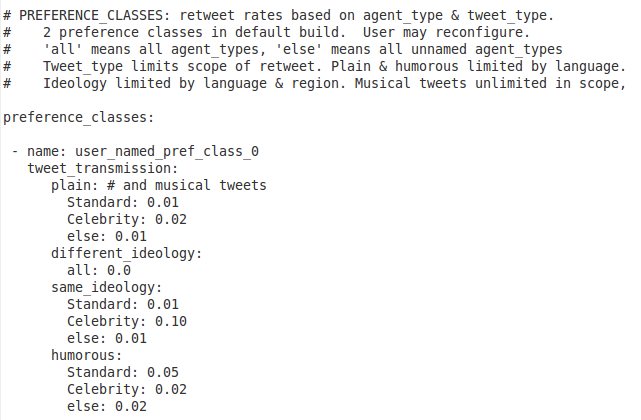
Below is an example of the quickstart_INFILE.yaml preference_class configuration.
Further Information
Implementation of #k@ is described more fully in Input documentation and in detailed tutorials with video demonstrations. A large network using 128 kb of RAM is demonstrated and other complex scenarios. For further information or feedback do not hesitate to contact us.